10. Deep convolutional models: case studies
为什么要进行实例探究?(Why look at case studies?)
Classic networks:
- LeNEt-5
- AlexNet
- VGG
- ResNet
- Inception
经典网络(Classic networks)
LeNet-5
[LeCun et al., 1998. Gradient-based learning applied to document recognition]
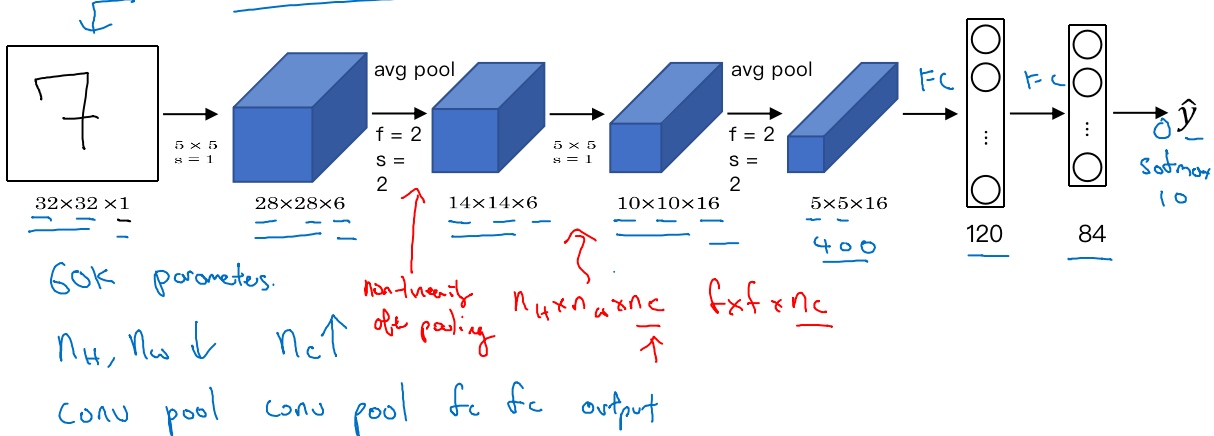
LeNet-5 has around 60000 parameters
Speciality on original paper:
- People used to apply sigmoid or tanh instead of reLU
- Every filters look at different channels of the input block(每个过滤器都采用和输入模块一样的通道数量) to save on computation and parameters(the computers were much slower back then)
- The sigmoid activation function(non-linearity) is applied after pooling layer
AlexNet
[Krizhevsky et al., 2012. ImageNet classification with deep convolutional neural networks]

(same padding formula: p = (f-1)/2)
- AlexNet has around 60m parameters
- Use ReLU activation
- Training on multiple GPUs (different layers were split across 2 different GPUs)
- Local response normalization(LRN) layer(Doesn’t help much)
AlexNet网络结构看起来相对复杂,包含大量超参数,这些数字(55×55×96、27×27×96、27×27×256……)
VGG-16
[Simonyan & Zisserman 2015. Very deep convolutional networks for large-scale image recognition]
VGG-16网络没有那么多超参数,这是一种只需要专注于构建卷积层的简单网络。它只用3×3,步幅为1的过滤器构建卷积层,padding参数为same卷积中的参数 和 用一个2×2,步幅为2的过滤器构建最大池化层
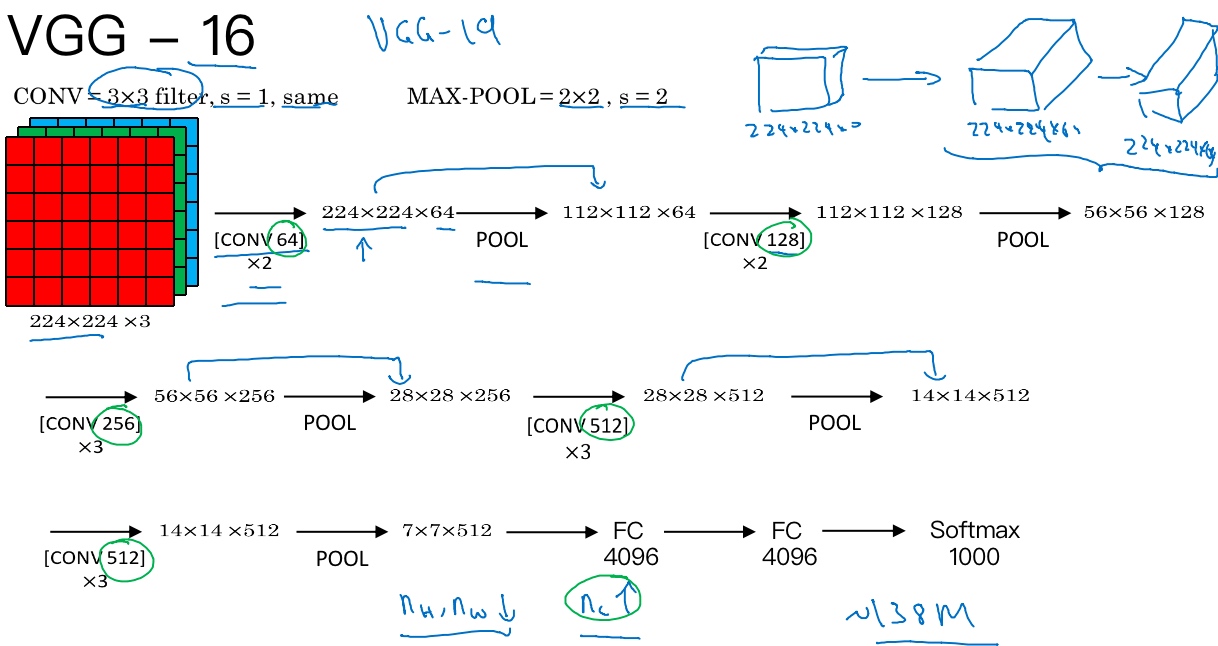
[conv 64]x2 代表用64个过滤器进行了2次卷积
It really simplified the neural network architechture.
16 in VGG-16 refers to the fact that has 16 layers that have to weight.
VGG-16 has around 138m parameters but architecture is simple and uniform (the number of filters in the conv layers keep doubling till 512(might be bigger enough)), it making the rate at which n_w,n_h goes down and number of filter goes up very systematic
残差网络(ResNets)(Residual Networks (ResNets))
[He et al., 2015. Deep residual networks for image recognition] 非常非常深的神经网络是很难训练的,因为存在梯度消失和梯度爆炸问题.
跳跃连接(Skip connection)可以从某一层网络层获取激活,然后迅速反馈给另外一层,甚至是神经网络的更深层.
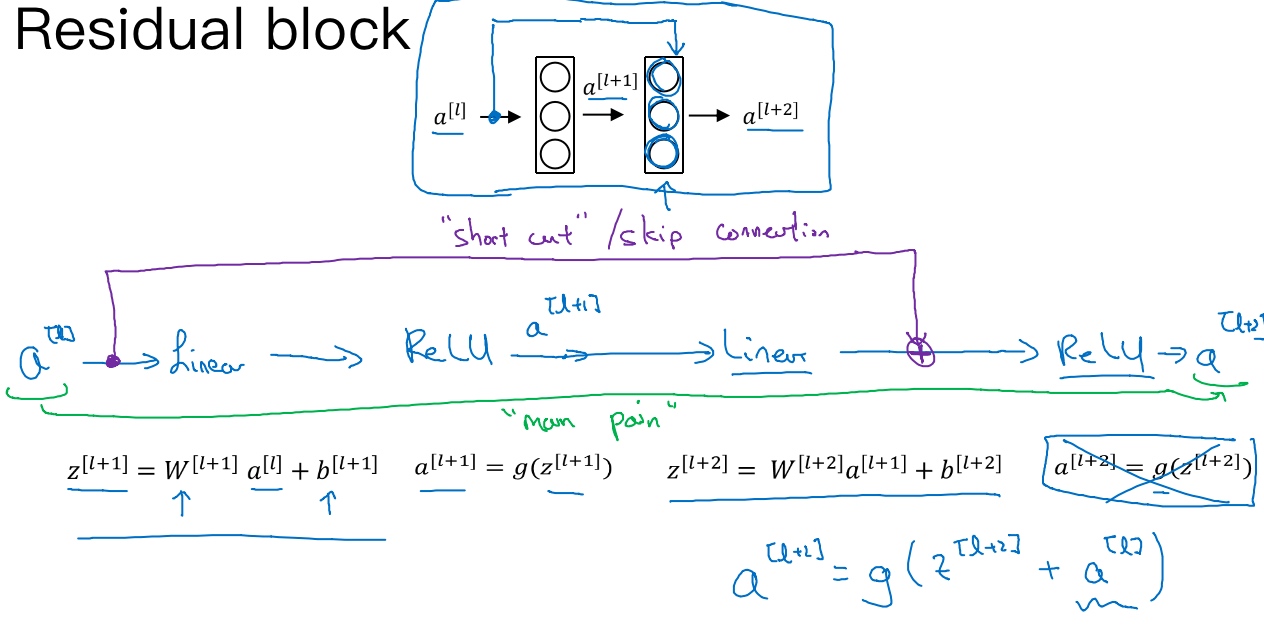
ResNets是由残差块(Residual block)构建的.
‘plain network’ - 普通神经网络走的图中的’main path’
然而’residual network’ - 残差神经网络走的是’short cut / skip connection’, 将$a^{[l]})$直接向后,拷贝到神经网络的深层,在ReLU非线性激活函数前加上a^{[l]}), 得到$a^{[l+2]} = g(z^{[l+2]} + a^{[l]})$, 注:$z^{[l+2]} = 0$, 所以$a^{[l+2]} = g(a^{[l]}) = a^{[l]}$ (因为ReLU:$f(x)=max(0,x)$)
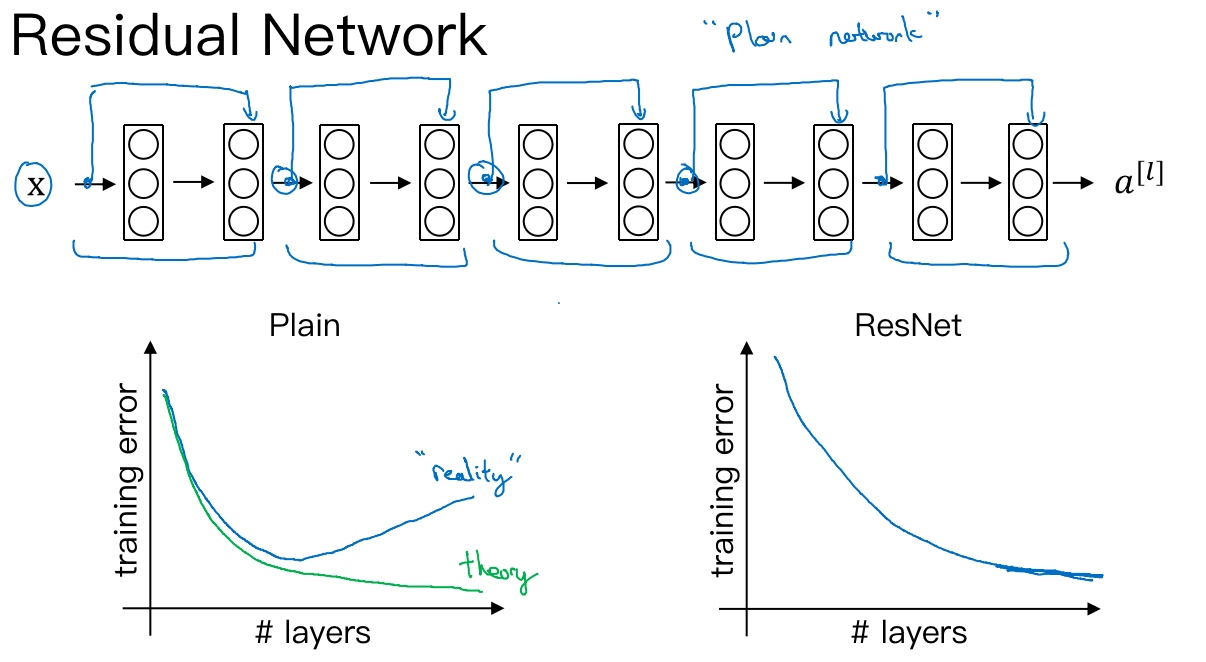
把’plain network’变成ResNet的方法是加上所有跳跃连接, 每两层增加一个捷径,构成一个残差块, 5个残差块连接在一起构成一个残差网络.
使用标准优化算法(梯度下降..)训练一个普通网络, 凭经验发现随着网络深度的加深,训练错误会先减少,然后增多. 而理论上,随着网络深度的加深,应该训练得越来越好才对. 实际上, 对于一个普通网络来说,深度越深意味着用优化算法越难训练(训练错误会越来越多).
残差网络确实有助于解决梯度消失和梯度爆炸问题,在训练更深网络的同时,又能保证良好的性能.
残差网络为什么有用?(Why ResNets work?)
$a^{[l+2]} = g(z^{[l+2]} + a^{[l]})$, 注:$z^{[l+2]} = 0$, 所以$a^{[l+2]} = g(a^{[l]}) = a^{[l]}$ (因为ReLU的非负特性:$f(x)=max(0,x)$)
结果表明,残差块学习这个恒等式函数并不难,跳跃连接使得很容易得出$a^{[l+2]} = a^{[l]}$
残差网络起作用的主要原因就是这些残差块学习恒等函数非常容易(普通神经网络当网络不断加深时,就算是选用学习恒等函数的参数都很困难),你能确定网络性能不会受到影响,很多时候甚至可以提高效率,或者说至少不会降低网络的效率,因此创建类似残差网络可以提升网络性能.
另一个细节是,假设$a^{[l+2]}$与$a^{[l]}$具有相同维度,所以ResNets使用了许多same卷积,所以这个$a^{[l]}$的维度等于这个输出层的维度. 之所以能实现跳跃连接是因为same卷积保留了维度,所以很容易得出这个捷径连接,并输出这两个相同维度的向量

为什么ResNet解决梯度消散:
ResNets的图片识别:
这个网络有很多层3×3卷积,而且它们大多都是same卷积,这就是添加等维特征向量的原因,维度得以保留.
网络中的网络以及 1×1 卷积(Network in Network and 1×1 convolutions)
[Lin et al., 2013. Network in network]
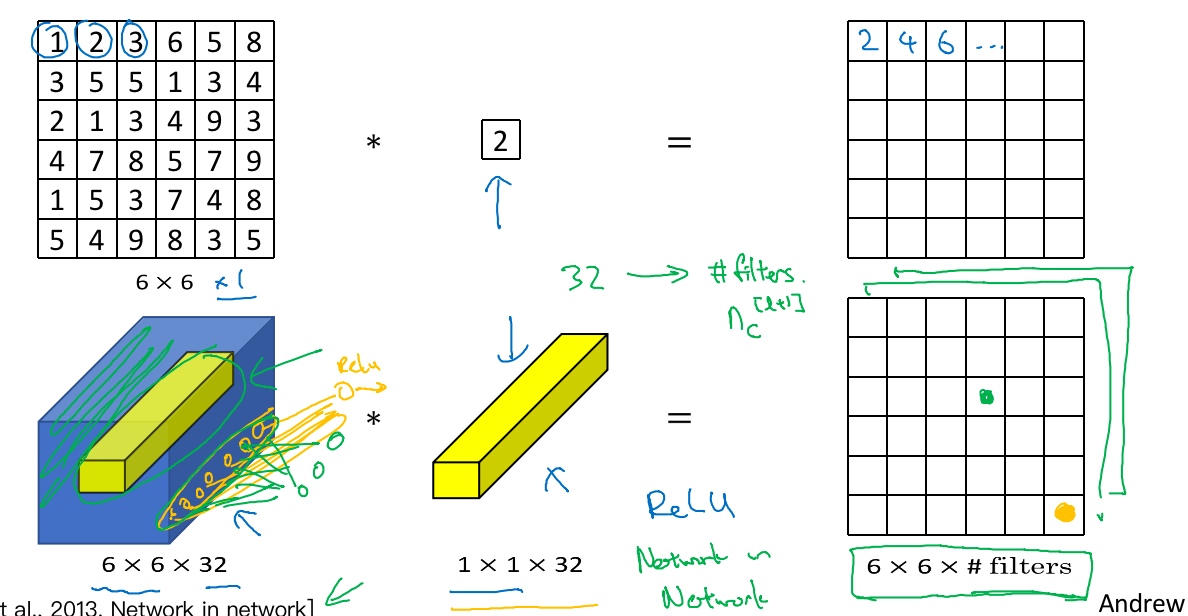
non-trivial:
A solution or example that is not trivial. Often, solutions or examples involving the number zero are considered trivial. Nonzero solutions or examples are considered nontrivial. For example, the equation x + 5y = 0 has the trivial solution (0, 0). Nontrivial solutions include (5, –1) and (–2, 0.4).
Using 1x1 convolutions:
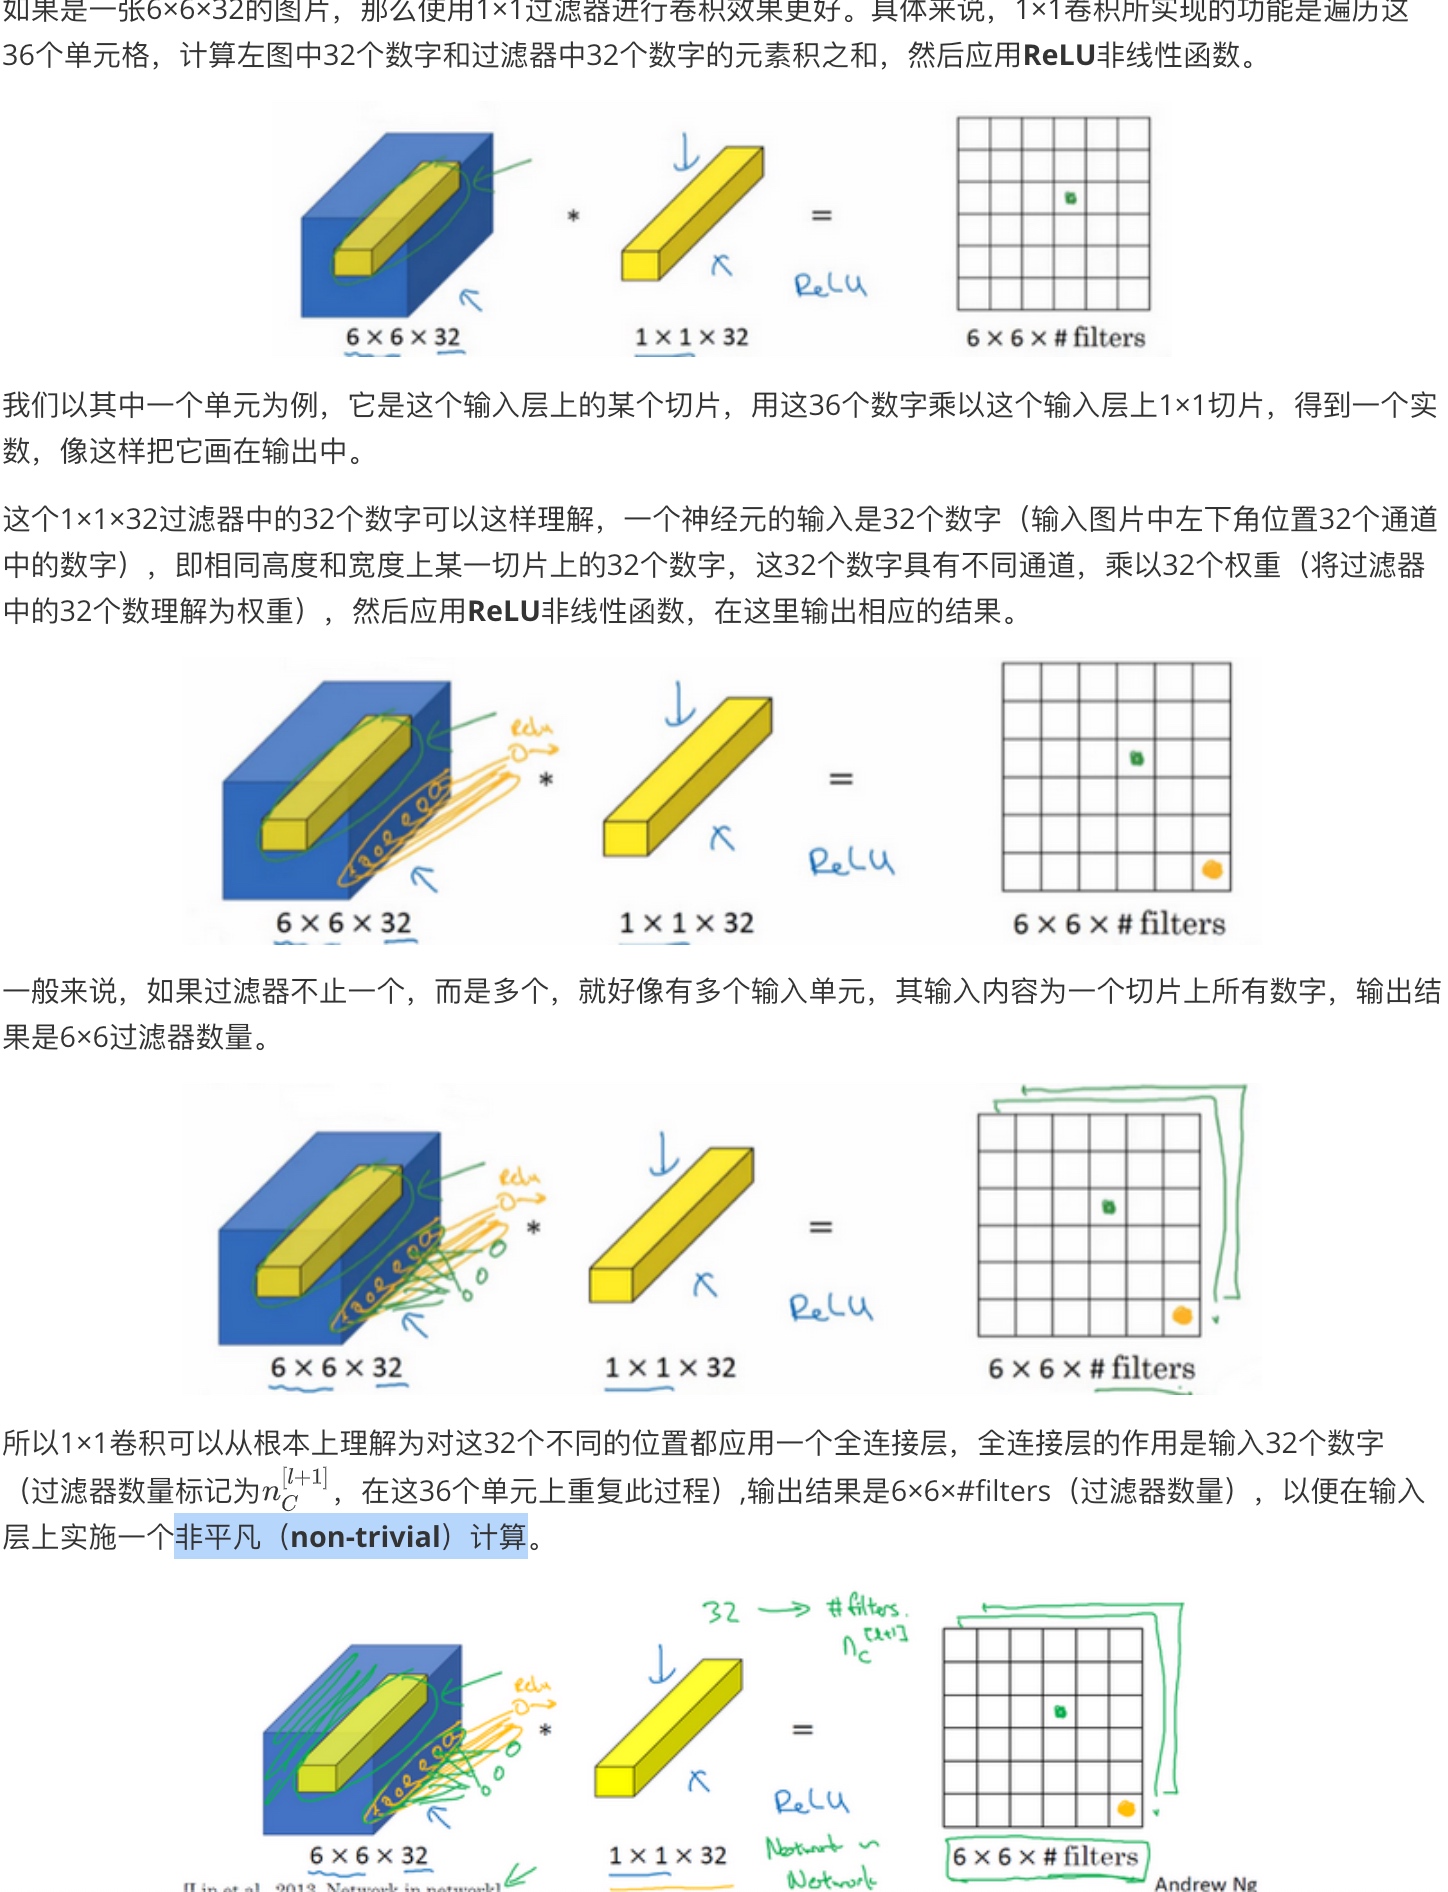
我们可以使用池化层压缩它的高度nH和宽度nW.
但是如果通道数量很大,该如何把它压缩为28×28×32维度的层呢?
- 可以用32个大小为1×1的过滤器,严格来讲每个过滤器大小都是1×1×192维(过滤器中通道数量必须与输入层中通道的数量保持一致) 但是你使用了32个过滤器,输出层为28×28×32,这就是压缩通道数(
$n_C$)的方法
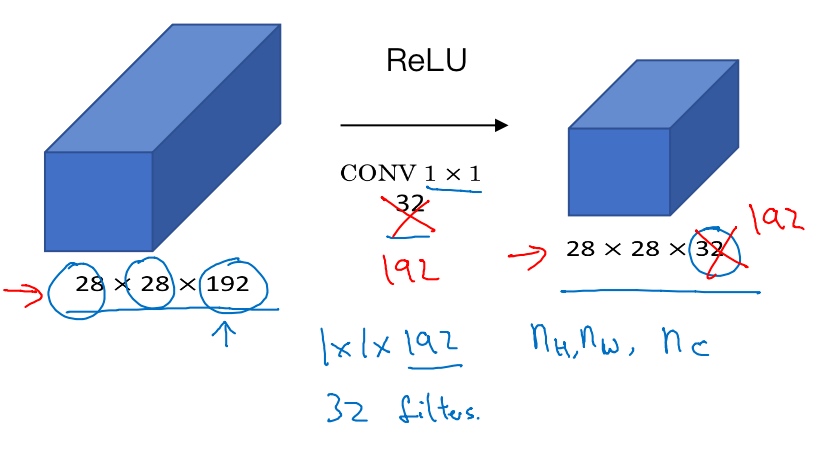
谷歌 Inception 网络简介(Inception network motivation)
[Szegedy et al. 2014. Going deeper with convolutions]
Inception网络的作用就是代替你来决定过滤器的大小,虽然网络架构因此变得更加复杂,但网络表现却非常好.
8×28×192维度的输入层, Inception层的作用就是代替人工来确定卷积层中的过滤器类型,或者确定是否需要创建卷积层或池化层:
- 第一层使用64个1x1的过滤器, 输出为28x28x64
- 第二层使用128个3x3的过滤器(用Same padding保持维度数), 输出为28x28x128
- 第三层使用32个5x5的过滤器(用Same卷积), 输出为28x28x32
- 第四层使用32个过滤器做最大池化(用Same卷积), 输出为28x28x32
最终组成一个Inception模块, 最终输出为28x28x256 (32+32+128+64=256).
但是计算成本, 下面是5×5过滤器在该模块中的计算成本:
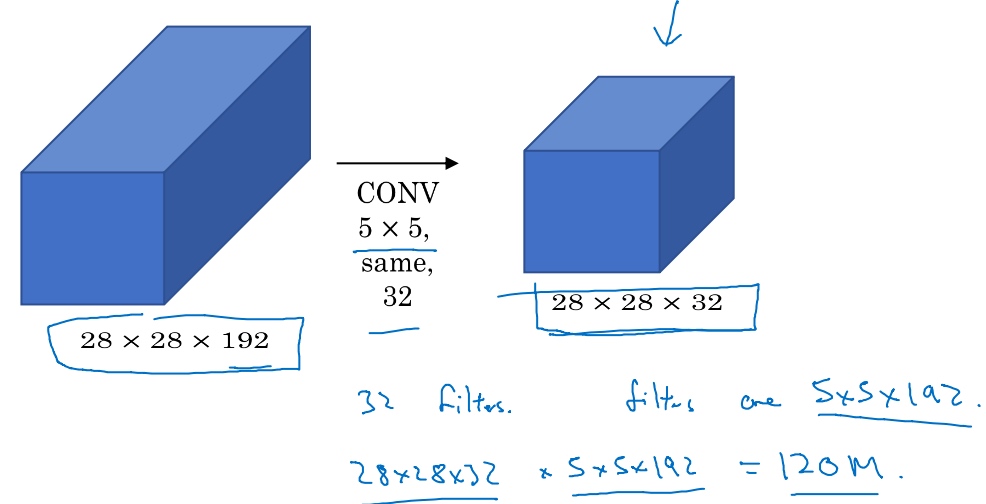
28×28×192的输入块,执行一个5×5卷积,它有32个过滤器,输出为28×28×32, 所以要计算28×28×32个数字. 对于输出中的每个数字来说,你都需要执行5×5×192次乘法运算,所以乘法运算的总次数为每个输出值所需要执行的乘法运算次数(5×5×192)乘以输出值个数(28×28×32),把这些数相乘结果等于1.2亿(120422400)
使用1×1卷积可以大幅度降低计算成本:
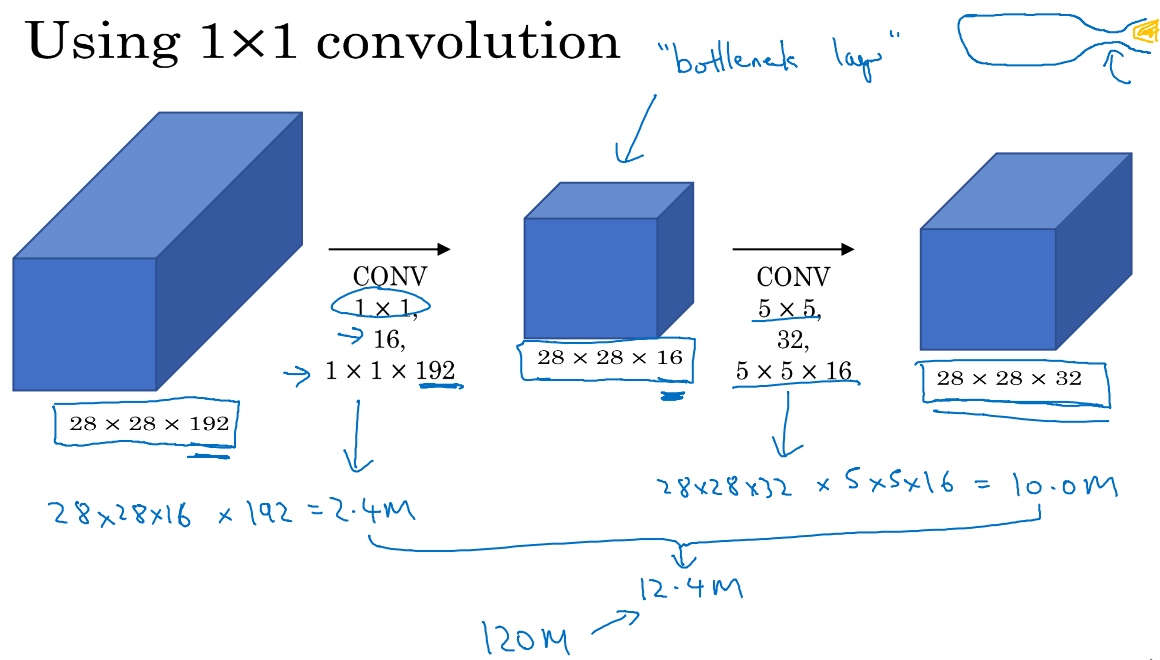
对于输入层28×28×192,使用1×1卷积把输入值从192个通道减少到16个通道. 然后对这个较小层运行5×5卷积,得到最终输出28×28×32 (输入和输出的维度依然相同). 中间那个1x1的卷积称为’bottleneck layer’瓶颈层. 瓶颈层是网络中最小的部分,先缩小网络表示,然后再扩大它
第一个卷积层的计算成本:
应用1×1卷积,过滤器个数为16,每个过滤器大小为1×1×192,这两个维度相匹配(输入通道数与过滤器通道数),28×28×16这个层的计算成本是,输出28×28×192中每个元素都做192次乘法,用1×1×192来表示,相乘结果约等于240万.
第二个卷积层的计算成本:
它的输出28×28×32,对每个输出值应用一个5×5×16维度的过滤器,计算结果为1000万.
乘法运算的总次数是这两层的计算成本之和,也就是1240万, 计算成本从1.2亿下降到了原来的十分之一.
仅仅大幅缩小表示层规模会不会影响神经网络的性能?事实证明,只要合理构建瓶颈层,既可以显著缩小表示层规模,又不会降低网络性能,从而节省了计算.
Inception 网络(Inception network)
Inception Module
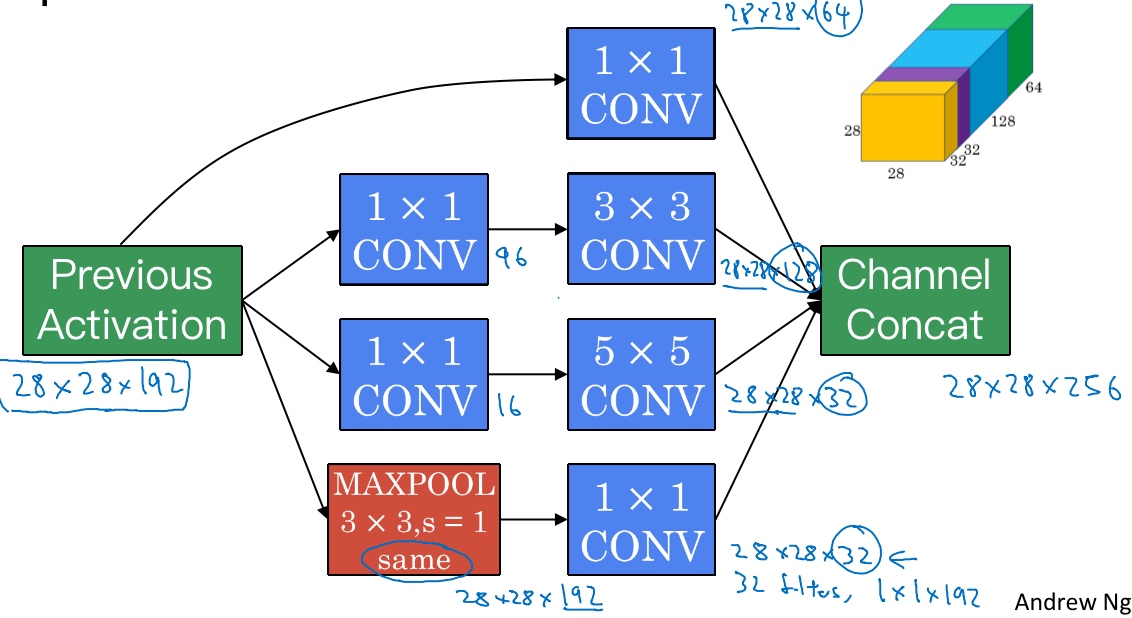
- 先通过一个1×1的层, 1×1的层可能有16个通道; 再通过5×5的层输出为28×28×32, 共32个通道
- 做相同的操作; 3×3的层将会输出28×28×128
- 其直接通过一个1×1的卷积层, 其直接通过一个1×1的卷积层, 输出是28×28×64
- 最后是池化层 (会使用same类型的padding来池化,使得输出的高和宽依然是28×28,这样才能将它与其他输出连接起来); 再加上一个1×1的卷积层(32个维度为1×1×192的过滤器), 将通道的数量缩小到28×28×32
最后,将这些方块全都连接起来。在这过程中,把得到的各个层的通道都加起来,最后得到一个28×28×256的输出
Inception network
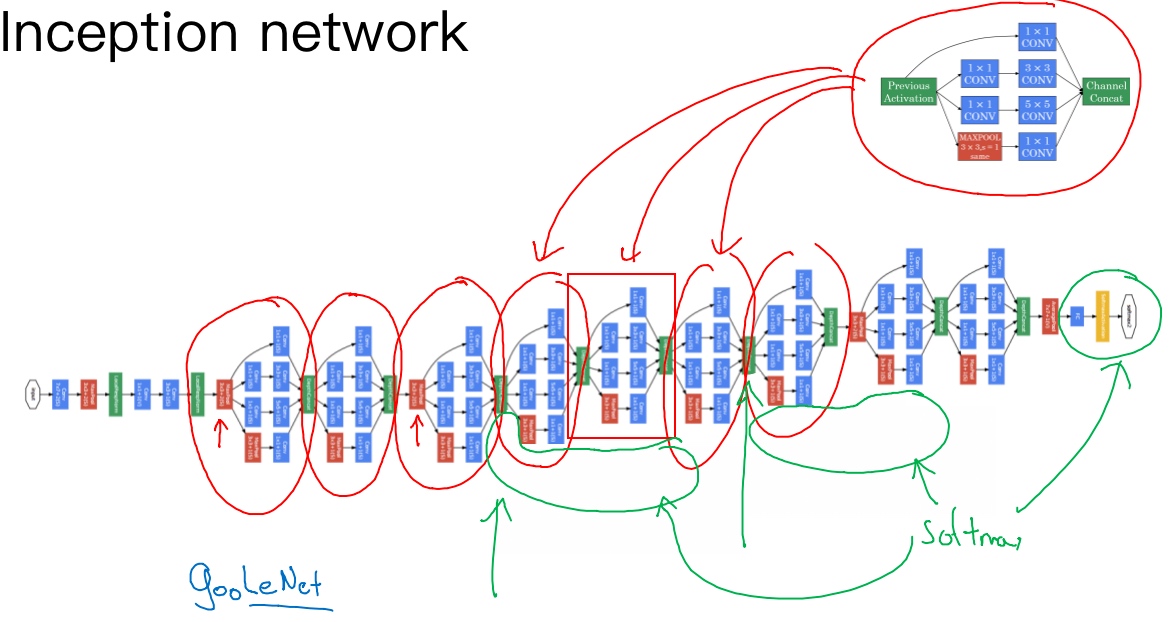
每一个红色圈住的都是一个Inception Module.
红色箭头指的是pooling layer, 用来改变维度, 缩减模型的大小.
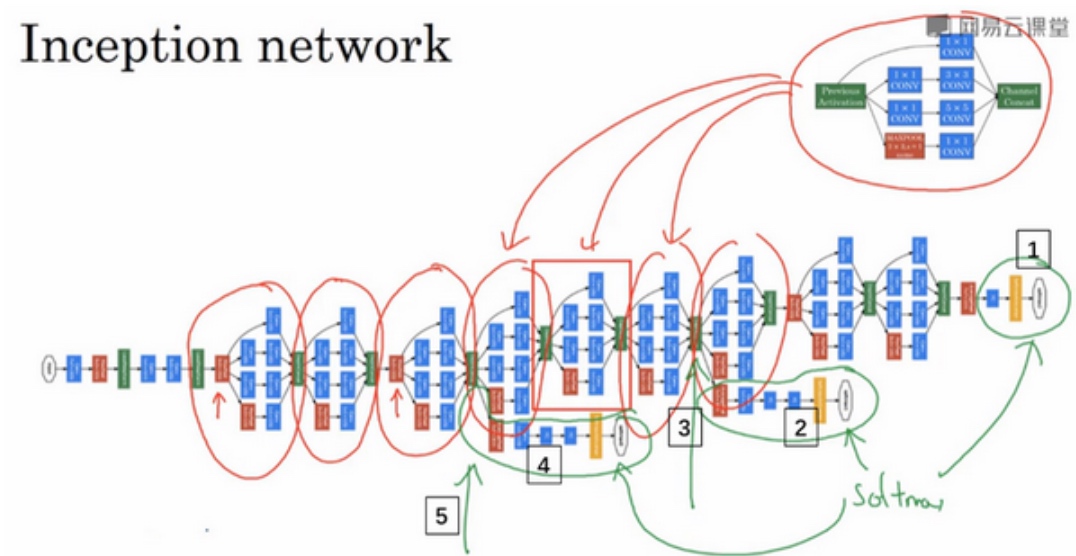
这里其实还有一些分支(绿色圈起来部分).
在网络的最后几层,通常称为全连接层,在它之后是一个softmax层(编号1)来做出预测,这些分支(编号2)所做的就是通过隐藏层(编号3)来做出预测,所以这其实是一个softmax输出(编号2),(编号1)也是. 另一条分支(编号4),它也包含了一个隐藏层,通过一些全连接层,然后有一个softmax来预测,输出结果的标签.
应该把它看做Inception网络的一个细节,它确保了即便是隐藏单元和中间层(编号5)也参与了特征计算,它们也能预测图片的分类. 它在Inception网络中,起到一种调整的效果,并且能防止网络发生过拟合. ???????
Inception网络是由Google公司的作者所研发的,它被叫做GoogleLeNet,这个名字是为了向LeNet网络致敬
Inception网络这个名字, 跟电影盗梦空间的名字一样, 作者其实是通过它来表明了建立更深的神经网络的决心.
Inception V2、V3以及V4,还有一个版本引入了跳跃连接(skip connection)的方法,有时也会有特别好的效果
迁移学习(Transfer Learning)
使用开源的实现方案(Using open-source implementations
ResNets实现的GitHub地址
https://github.com/KaimingHe/deep-residual-networks
迁移学习 许多数据集已经上传到网上, 比如ImageNet, MS COCO或者Pascal类型的数据集…大量的计算机视觉研究者已经用这些数据集训练过他们的算法了, 这就意味着你可以下载花费了别人好几周甚至几个月而做出来的开源的权重参数,把它当作一个很好的初始化用在你自己的神经网络上(用迁移学习把公共的数据集的知识迁移到你自己的问题上).
Build a Cat detector - 1. Tigger 2. Misty 3. Neither
Download a neural network source code with parameters(weight), E.g. ImageNet dataset with 1000 categories, so there is a Softmax unit.
在拥有的数据集很少的情况下:
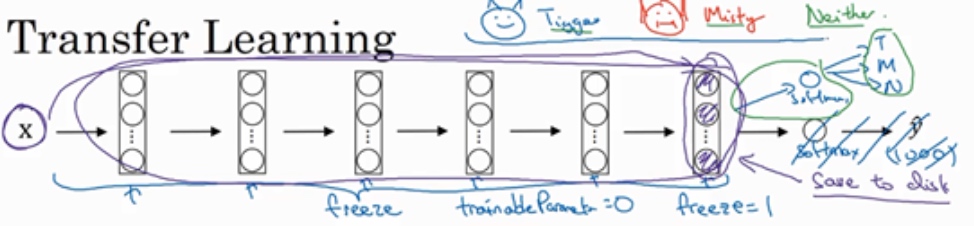
- 去掉Softmax层,创建自己的Softmax单元,用来输出Tigger、Misty和neither三个类别; 把所有的层看作是冻结的,冻结网络中所有层的参数,只需要训练和Softmax层有关的参数
- 大多数深度学习框架都支持这种操作, 也许会有
trainableParameter=0这样的参数, 或者freeze=1 - 由于前面的层都冻结了,相当于一个固定的函数, 不需要改变, 所以可先计算(紫色箭头标记)的这一层, 计算特征或者激活值, 然后把它们存到硬盘里; 取任意输入图像X,然后把它映射到固定函数(softmax层之前的所有层视为一个固定映射), 得到某个特征向量,这样你训练的就是一个很浅的softmax模型
在拥有的数据集更大的情况下:
 - 应该冻结更少的层; 然后训练后面的层; 最后构建自己的输出单元,Tigger、Misty或者两者都不是三个类别
- 可以取后面几层的权重,用作初始化,然后开始梯度下降
- 也可以直接去掉这几层,换成自己的隐藏单元和你自己的softmax输出层
- 有越来越多的数据,你需要冻结的层数越少,你能够训练的层数就越多
- 应该冻结更少的层; 然后训练后面的层; 最后构建自己的输出单元,Tigger、Misty或者两者都不是三个类别
- 可以取后面几层的权重,用作初始化,然后开始梯度下降
- 也可以直接去掉这几层,换成自己的隐藏单元和你自己的softmax输出层
- 有越来越多的数据,你需要冻结的层数越少,你能够训练的层数就越多
在拥有的数据集庞大的情况下:

- 用开源的网络和它的权重,所有的权重当作初始化,然后训练整个网络
数据增强(Data augmentation)
Common augmentation method
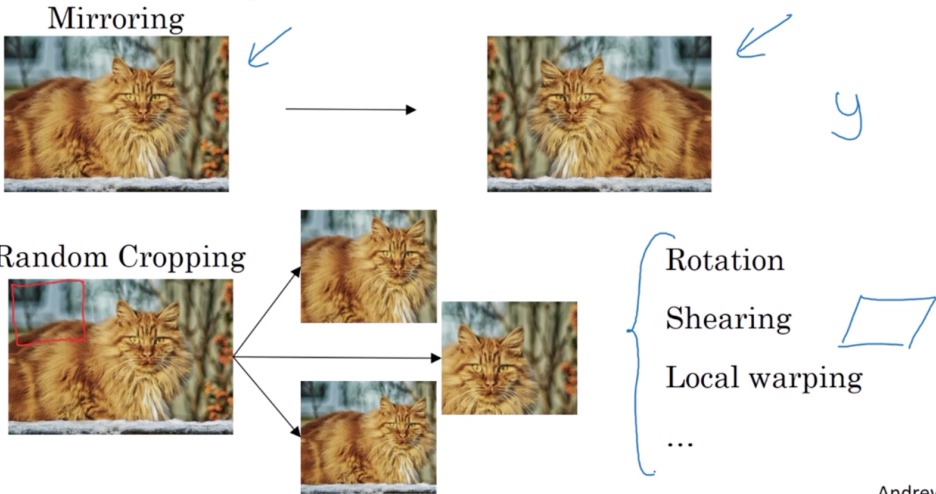
- 垂直镜像对称
- 随机剪裁
- 旋转
- 剪切(图像仅水平或垂直坐标发生变化)
- 局部弯曲
- ….
Color shifting
彩色转换, 然后给R、G和B三个通道上加上不同的失真值.
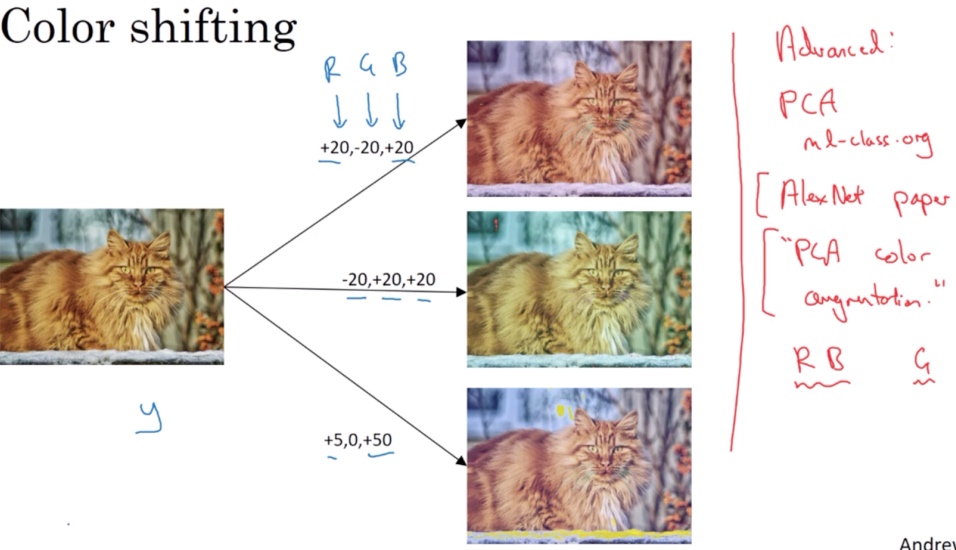
在实践中,R、G和B的值是根据某种概率分布来决定的
Advance:
对R、G和B有不同的采样方式,其中一种影响颜色失真的算法是PCA,即主成分分析. 颜色改变的细节在AlexNet的论文中有时候被称作PCA颜色增强,PCA颜色增强的大概含义是,比如说,如果你的图片呈现紫色,即主要含有红色和蓝色,绿色很少,然后PCA颜色增强算法就会对红色和蓝色增减很多,绿色变化相对少一点,所以使总体的颜色保持一致
Implementing distortions during training
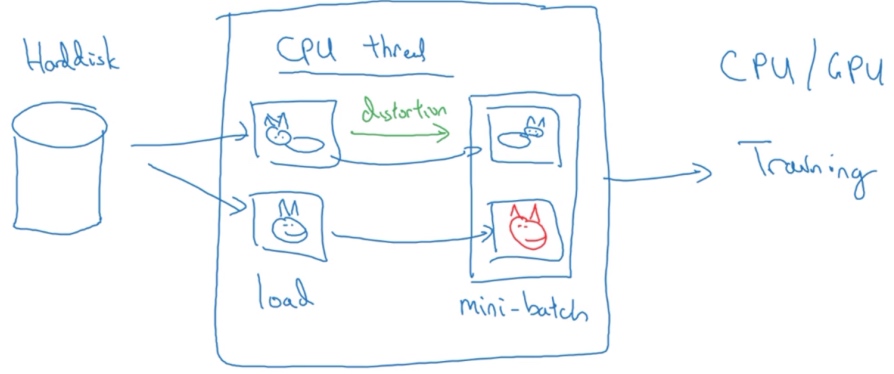
当有特别大的训练数据的时候, 可能会使用CPU线程,然后它不停的从硬盘中读取数据,所以有一个从硬盘过来的图片数据流。可以用CPU线程来实现这些失真变形,可以是随机裁剪、颜色变化,或者是镜像, 但是对每张图片得到对应的某一种变形失真形式.
与此同时,CPU线程持续加载数据,然后实现任意失真变形,从而构成批数据或者最小批数据,这些数据持续的传输给其他线程或者其他的进程,然后开始训练,可以在CPU或者GPU上实现训一个大型网络的训练。
计算机视觉现状(The state of computer vision)
Data vs. hand-engineering
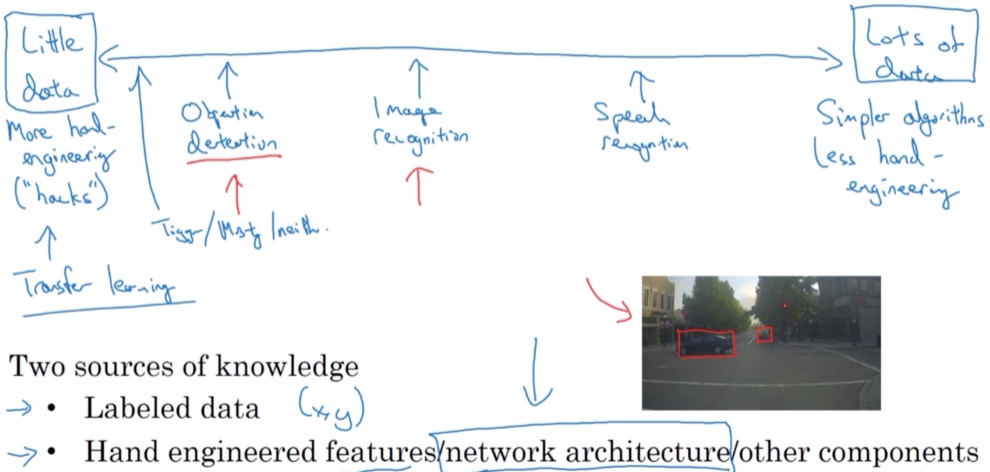
- 当有很多数据时,人们倾向于使用更简单的算法和更少的手工工程,因为我们不需要为这个问题精心设计特征
- 当数据少的时候, 人们从事更多的是手工工程
这也是计算机视觉领域发展相当复杂网络架构地原因,因为在缺乏更多数据的情况下,获得良好表现的方式还是花更多时间进行架构设计; 在计算机视觉上仍然有很多的网络架构使用手工工程,这就是为什么会在计算机视觉中看到非常复杂的超参数选择,比在其他领域中要复杂的多
Two sources of knowledge
- Labeled data
- Hand engineered features/network architecture/other components
这么少的数据,迁移学习会有很大帮助.
Benchmark 基准测试,Benchmark是一个评价方式,在整个计算机领域有着长期的应用。维基百科上解释:“As computer architecture advanced, it became more difficult to compare the performance of various computer systems simply by looking at their specifications.Therefore, tests were developed that allowed comparison of different architectures.”Benchmark在计算机领域应用最成功的就是性能测试,主要测试负载的执行时间、传输速度、吞吐量、资源占用率等。
Tips for doing well on benchmarks/winning competitions(一些有助于在基准测试/竞赛中表现出色的小技巧):
Ensembling(集成)
- Train several networks independently and average their outputs (可以独立训练几个神经网络,并平均它们的输出, 这可能会让你在基准上提高1%,2%或者更好)
- 但是集成意味着要对每张图片进行测试,可能需要在多个不同的网络中运行一个图像,运行时间会变慢. 所以集成是人们在基准测试中表现出色和赢得比赛的利器,但这几乎不用于生产服务于客户的
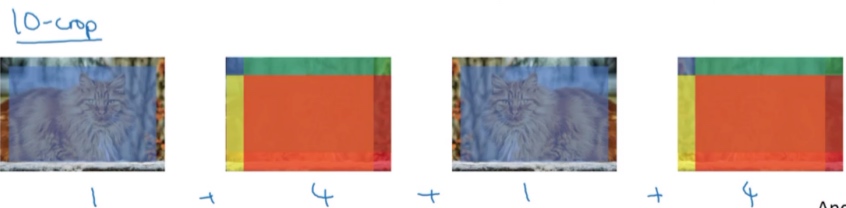
Multi-crop at test time (将数据扩充应用到测试图像中的一种形式)
- Run classifier on multiple versions of test images and average results
Use open source code
- Use architecture of networks published in the literation
- Use open source implementation if possible
- Use pre-trained models and fine-tune on your dataset
要想建立一个实用的系统,你最好先从其他人的神经网络架构入手。如果可能的话,你可以使用开源的一些应用,因为开放的源码实现可能已经找到了所有繁琐的细节,比如学习率衰减方式或者超参数
Code
Keras
def HappyModel(input_shape):
    """
    Implementation of the HappyModel.

    Arguments:
    input_shape -- shape of the images of the dataset

    Returns:
    model -- a Model() instance in Keras
    """

    ### START CODE HERE ###
    # Feel free to use the suggested outline in the text above to get started, and run through the whole
    # exercise (including the later portions of this notebook) once. The come back also try out other
    # network architectures as well.
        # Define the input placeholder as a tensor with shape input_shape. Think of this as your input image!
    X_input = Input(input_shape)

    # Zero-Padding: pads the border of X_input with zeroes
    X = ZeroPadding2D((3, 3))(X_input)

    # CONV -> BN -> RELU Block applied to X
    X = Conv2D(32, (7, 7), strides=(1, 1), name='conv0')(X)
    X = BatchNormalization(axis=3, name='bn0')(X)
    X = Activation('relu')(X)

    # MAXPOOL
    X = MaxPooling2D((2, 2), name='max_pool')(X)

    # FLATTEN X (means convert it to a vector) + FULLYCONNECTED
    X = Flatten()(X)
    X = Dense(1, activation='sigmoid', name='fc')(X)

    # Create model. This creates your Keras model instance, you'll use this instance to train/test the model.
    model = Model(inputs=X_input, outputs=X, name='HappyModel')

    return model
    ### END CODE HERE ###

    return model
happyModel = HappyModel(X_train.shape[1:])
happyModel.compile('adam', 'binary_crossentropy', metrics=['accuracy'])
happyModel.fit(X_train, Y_train, epochs=40, batch_size=50)
preds = happyModel.evaluate(X_test, Y_test, batch_size=32, verbose=1, sample_weight=None)
print ("Loss = " + str(preds[0]))
print ("Test Accuracy = " + str(preds[1]))Identity Block
def identity_block(X, f, filters, stage, block):
    """
    Implementation of the identity block as defined in Figure 3

    Arguments:
    X -- input tensor of shape (m, n_H_prev, n_W_prev, n_C_prev)
    f -- integer, specifying the shape of the middle CONV's window for the main path
    filters -- python list of integers, defining the number of filters in the CONV layers of the main path
    stage -- integer, used to name the layers, depending on their position in the network
    block -- string/character, used to name the layers, depending on their position in the network

    Returns:
    X -- output of the identity block, tensor of shape (n_H, n_W, n_C)
    """

    # defining name basis
    conv_name_base = 'res' + str(stage) + block + '_branch'
    bn_name_base = 'bn' + str(stage) + block + '_branch'

    # Retrieve Filters
    F1, F2, F3 = filters  # 2 ,4 ,6

    # Save the input value. You'll need this later to add back to the main path.
    X_shortcut = X
#     print('X_shortcut:',X_shortcut)

    # First component of main path
    X = Conv2D(filters = F1, kernel_size = (1, 1), strides = (1,1), padding = 'valid', name = conv_name_base + '2a', kernel_initializer = glorot_uniform(seed=0))(X)
    X = BatchNormalization(axis = 3, name = bn_name_base + '2a')(X)
    X = Activation('relu')(X)

    ### START CODE HERE ###

    # Second component of main path (≈3 lines)
    X = Conv2D(filters = F2, kernel_size = (f, f), strides = (1,1), padding = 'same', name = conv_name_base + '2b', kernel_initializer = glorot_uniform(seed=0))(X)
    X = BatchNormalization(axis = 3, name = bn_name_base + '2b')(X)
    X = Activation('relu')(X)


    # Third component of main path (≈2 lines)
    X = Conv2D(filters = F3, kernel_size = (1, 1), strides = (1,1), padding = 'valid', name = conv_name_base + '2c', kernel_initializer = glorot_uniform(seed=0))(X)
    X = BatchNormalization(axis = 3, name = bn_name_base + '2c')(X)

    # Final step: Add shortcut value to main path, and pass it through a RELU activation (≈2 lines)
    X = Add()([X, X_shortcut])
    X = Activation('relu')(X)

    ### END CODE HERE ###

    return X
50-ResNet
def ResNet50(input_shape = (64, 64, 3), classes = 6):
    """
    Implementation of the popular ResNet50 the following architecture:
    CONV2D -> BATCHNORM -> RELU -> MAXPOOL -> CONVBLOCK -> IDBLOCK*2 -> CONVBLOCK -> IDBLOCK*3
    -> CONVBLOCK -> IDBLOCK*5 -> CONVBLOCK -> IDBLOCK*2 -> AVGPOOL -> TOPLAYER

    Arguments:
    input_shape -- shape of the images of the dataset
    classes -- integer, number of classes

    Returns:
    model -- a Model() instance in Keras
    """

    # Define the input as a tensor with shape input_shape
    X_input = Input(input_shape)

    # Zero-Padding
    X = ZeroPadding2D((3, 3))(X_input)

    # Stage 1
    X = Conv2D(64, (7, 7), strides=(2, 2), name='conv1', kernel_initializer=glorot_uniform(seed=0))(X)
    X = BatchNormalization(axis=3, name='bn_conv1')(X)
    X = Activation('relu')(X)
    X = MaxPooling2D((3, 3), strides=(2, 2))(X)

    # Stage 2
    X = convolutional_block(X, f=3, filters=[64, 64, 256], stage=2, block='a', s=1)
    X = identity_block(X, 3, [64, 64, 256], stage=2, block='b')
    X = identity_block(X, 3, [64, 64, 256], stage=2, block='c')

    ### START CODE HERE ###

    # Stage 3 (≈4 lines)
    X = convolutional_block(X, f=3, filters=[128, 128, 512], stage=3, block='a', s=2)
    X = identity_block(X, 3, [128, 128, 512], stage=3, block='b')
    X = identity_block(X, 3, [128, 128, 512], stage=3, block='c')
    X = identity_block(X, 3, [128, 128, 512], stage=3, block='d')

    # Stage 4 (≈6 lines)
    X = convolutional_block(X, f=3, filters=[256, 256, 1024], stage=4, block='a', s=2)
    X = identity_block(X, 3, [256, 256, 1024], stage=4, block='b')
    X = identity_block(X, 3, [256, 256, 1024], stage=4, block='c')
    X = identity_block(X, 3, [256, 256, 1024], stage=4, block='d')
    X = identity_block(X, 3, [256, 256, 1024], stage=4, block='e')
    X = identity_block(X, 3, [256, 256, 1024], stage=4, block='f')

    # Stage 5 (≈3 lines)
    X = X = convolutional_block(X, f=3, filters=[512, 512, 2048], stage=5, block='a', s=2)
    X = identity_block(X, 3, [512, 512, 2048], stage=5, block='b')
    X = identity_block(X, 3, [512, 512, 2048], stage=5, block='c')


    # AVGPOOL (≈1 line). Use "X = AveragePooling2D(...)(X)"
    X = AveragePooling2D(pool_size=(2, 2), padding='same')(X)

    ### END CODE HERE ###

    # output layer
    X = Flatten()(X)
    X = Dense(classes, activation='softmax', name='fc' + str(classes), kernel_initializer = glorot_uniform(seed=0))(X)


    # Create model
    model = Model(inputs = X_input, outputs = X, name='ResNet50')

    return model
model = ResNet50(input_shape = (64, 64, 3), classes = 6)
model.compile(optimizer='adam', loss='categorical_crossentropy', metrics=['accuracy'])
X_train_orig, Y_train_orig, X_test_orig, Y_test_orig, classes = load_dataset()
# Normalize image vectors
X_train = X_train_orig/255.
X_test = X_test_orig/255.
# Convert training and test labels to one hot matrices
Y_train = convert_to_one_hot(Y_train_orig, 6).T
Y_test = convert_to_one_hot(Y_test_orig, 6).T
print ("number of training examples = " + str(X_train.shape[0]))
print ("number of test examples = " + str(X_test.shape[0]))
print ("X_train shape: " + str(X_train.shape))
print ("Y_train shape: " + str(Y_train.shape))
print ("X_test shape: " + str(X_test.shape))
print ("Y_test shape: " + str(Y_test.shape))
model.fit(X_train, Y_train, epochs = 20, batch_size = 32)
preds = model.evaluate(X_test, Y_test)
print ("Loss = " + str(preds[0]))
print ("Test Accuracy = " + str(preds[1]))
model.summary()
plot_model(model, to_file='model.png')
SVG(model_to_dot(model).create(prog='dot', format='svg'))